Purpose
This document outlines the process for performing a Tape Pull test.
Scope
This document covers Tape Pull test done on a lens from any customer.
Definitions
- n/a
Responsibilities
Lens Tester – Person responsible for performing all aspects of lens testing after the lenses have been delivered by Receiving.
Materials and Equipment
- Scotch Magic Tape #810, 3/4″ wide
- Force guage
- Centimeter ruler
- Microfilament cloths
- Gloves
Procedures
- Remove and dispose of the first 10 cm of tape. This is to make sure the adhesive part of the tape has not been exposed to air.
- Take off a 10 cm length of tape. Be careful not to touch the adhesive part to anything.
- On the convex side of the lens, starting 2.5 cm down from the center of the lens, apply 5 cm of one end of the tape toward the top half of the lens. If done properly, approximately 2.5 cm of tape should be in each half of the lens, and there will be 5 cm of unattached tape. The area of tape contact will be 9.5 cm2(A [cm2]).
- Flip the unattached tape up 90°. Attach the end of the tape to the gauge arm.
- Smoothly pull the tape straight upwards from the lens while watching the gauge.
- Record the force that was required.
- After the tape pull, wipe the lens with alcohol and a cloth to remove any adhesive residue.
RHS-45 Solutions Management (Percent of Solids)
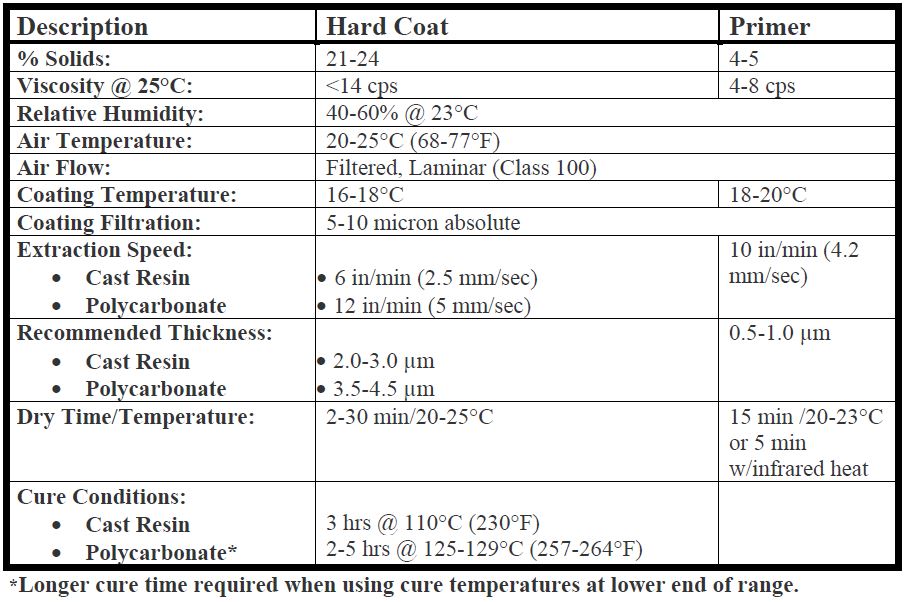
The RHS-45 primer and hard coat solutions are designed for use in dip coating systems. The solvents used in the coating solutions (primer and hardcoat) evaporate quickly. During operation of the system, the solutions are exposed to air and the solvents evaporate, thus changing the viscosity of the solutions. The viscosity of the coating solutions is a critical component in creating the correct hardcoat thickness. The hardcoat thickness determines overall quality of the hardcoat. In summary, consistent viscosity of the coating solution is critical to the consistent quality of the hardcoat.
Viscosity of coating solutions is defined as “% of Solids”. This is a ratio between the liquid components (solvent) and solid components (hardcoat) of the solution. If the % of solids in a
solution needs to be decreased, which is generally the case, solvent is added to the solution. If the % of solids needs to be increased, it is done by adding a solution of a higher % of solids ratio or
by evaporation of the solvent.
Before beginning production, the % of solids of the solutions in the coating system must be within specifications. Refer to the coating solutions Tech Sheets for these specifications. A measurement of the % of solids needs to be taken daily to determine what adjustments, if any, should be made to meet the specifications.
Percent (%) of Solids Measurement
Equipment and Materials
The following tools will be needed to perform this procedure:
- Gram scale, 0.01 resolution or better
- Desk lamp, with reflector type lamp
- Sample pans, disposable; Quantum part #HC-00005
- Pipettes, disposable; Quantum part #HC-00007
- Calculator
Set-up
- Place the scale on a level surface for proper scale operation.
- Position the lamp close by for convenient use. The lamp should be a reflector type for focused heat energy on the pan of liquid. Heat should not be extreme enough that the liquid boils out of the pan–just enough to accelerate the drying process.
Measurement
- Place a clean pan onto the scale, write down the weight of the pan, then zero (tare) the scale. Make sure that the scale reads zeros in the display before the sample is placed in the pan.
- Using a pipette, remove liquid to be analyzed from the tank and place in the sample pan. Add liquid until 5.00g is indicated on the display.
- Set the sample pan with liquid under the lamp. Turn on the lamp and let sample dry completely (amount of time necessary will vary depending on the lamp and configuration used).
- Place the sample back onto the scale and measure the dry weight. Subtract the empty pan weight from the dry weight measurement to get the weight of the solids only.
- Using the calculator, divide the dry weight by the liquid weight then multiply by 100 for percentage. The result is the percentage of solids measurement. See the example below:
Example
- Liquid weight = 5.00g
- Dry Weight = 0.6g
- 0.6g ÷ 5.00g = 0.12
- 0.12 x 100 for percent = 12% solids
Recommended Operating Guidelines (Solutions)
Tank Fill Procedure
- Add solvent or solution (hardcoat or primer) to the overflow side of the tank.
- Pour solvent or solution slowly and carefully so that no bubbles are formed.
- After adding solvent or solution, allow the solution in the tank to circulate for 15 minutes to completely mix in the added material.
- Measure % of solids after solution has been thoroughly mixed. The % of solids specification must be met before beginning production.
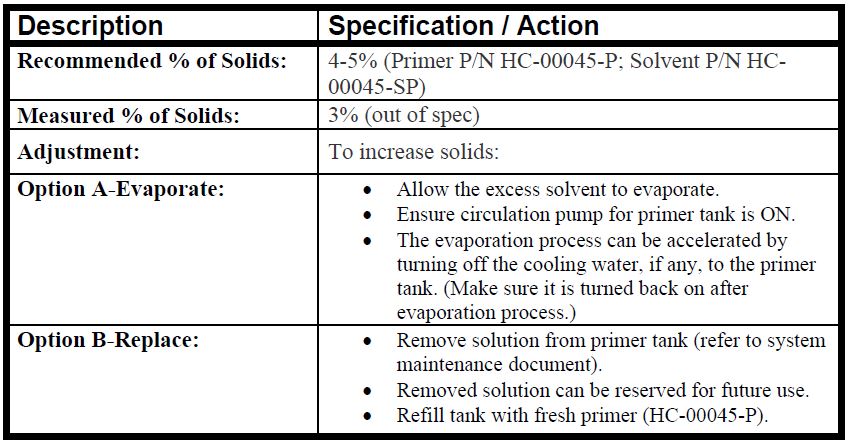
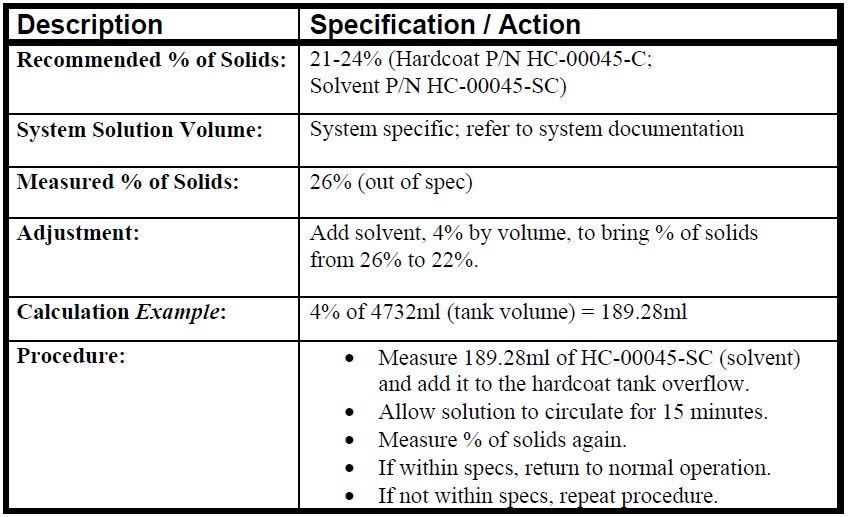
Percent of Solids Adjustment
Note: Do not add too much solvent to the solution. If the % of solids are too low, the necessary adjustment is time consuming and more difficult.
If % of Solids is Too High
If % of Solids is Too Low